How to set up a debugger in PhpStorm for a project that is running in a VirtualBox
Setting up a debugger in PhpStorm for a project running in a VirtualBox (in this case we are using Vagrant and Homestead on Windows 11 for the Laravel project) involves configuring both the server side and the client side (PhpStorm) for debugging. The process mainly involves setting up Xdebug on your virtual machine and then configuring PhpStorm to communicate with it.
Here are step-by-step instructions:
Install & Configure Xdebug on VirtualBox Server (Homestead)
- SSH into your Vagrant box:
vagrant ssh - Install Xdebug:
sudo apt-get install php-xdebug - Update the Xdebug configuration. Open the Xdebug configuration file in an editor like `nano`:
sudo nano /etc/php/8.1/mods-available/xdebug.ini
Then, add or modify the configuration described:
zend_extension=xdebug.so
xdebug.mode=debug
xdebug.discover_client_host = true
xdebug.start_with_request=yes
xdebug.log=/var/log/xdebug.log
The path to this file may differ depending on your server configuration and PHP version.
To find the Xdebug configuration file you need:
sudo find /etc/php -name '*xdebug*'
This command should list all files and directories containing the word "xdebug" within `/etc/php`. Look for a `.ini` file in the results. If you see one, that's likely your Xdebug configuration file. Take note of its path.
If you don't see any `.ini` file for Xdebug, it might not be properly installed or linked. In such a case, you might want to reinstall Xdebug or ensure it's enabled.
For a typical web development setup with Vagrant and Homestead using nginx or Apache, you're most likely using PHP-FPM. Therefore, you should modify the file associated with FPM:
/etc/php/8.1/fpm/conf.d/20-xdebug.ini
However, keep in mind that if this 20-xdebug.ini file is a symbolic link to /etc/php/8.1/mods-available/xdebug.ini (which is very likely), then updating either one will affect all contexts (CGI, PHPDBG, and FPM). So, if you modify the mods-available/xdebug.ini file, it will change the settings for all the others, provided they're symbolic links.
To determine if a file is a symbolic link, you can use the ls command with the -l option:
ls -l /etc/php/8.1/fpm/conf.d/20-xdebug.ini - Restart the PHP Service:
sudo service --status-all | grep php | awk '{print $4}' | xargs -I {} sudo service {} restart
Configure PhpStorm
- Open PhpStorm.
- Go to `File` > `Settings` (or `PhpStorm` > `Preferences` on macOS).
- Select `PHP`.
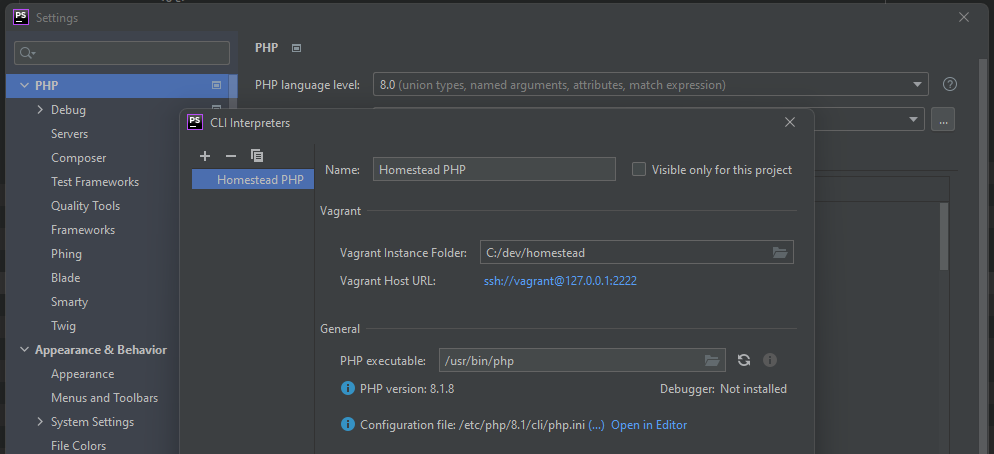
- Click on the `...` button next to the CLI interpreter. Here, you can set up a remote interpreter if you haven't already. This ensures PhpStorm is aware of the PHP executable and configuration inside the Vagrant box.
- Still in the settings, select `PHP` > `Servers`.
- Click on the `+` button to add a new server:
- Name: Any name, e.g., `MyProject`
- Host: `myproject.test`
- Port: `80`
- Debugger: `Xdebug`
- Use path mappings:
- Map the directory on your local machine to the directory in your Vagrant box.
For example, if your project is in `c:\dev\my_project` on your host machine and in `/home/vagrant/code/my_project` in the Vagrant box, set this mapping.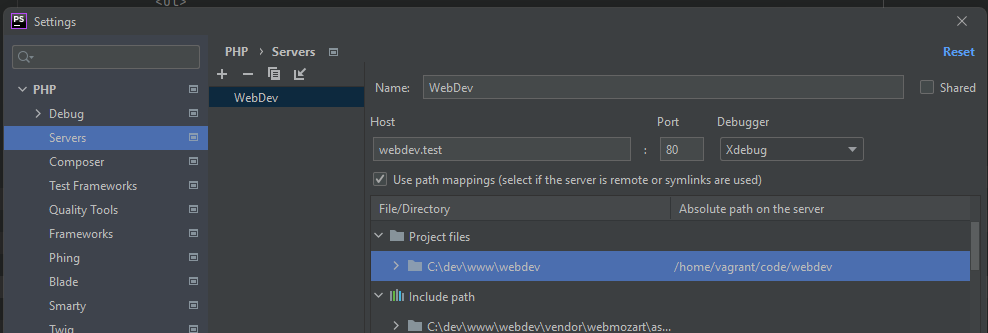
- Select `PHP` > `Debug`
Ensure the `Debug port` is set to `9003` (or whatever port you've set in Xdebug configuration). - Click `Apply` and then `OK`.
Starting a Debugging Session
- Set a breakpoint in PhpStorm by clicking in the margin next to the line of code.
- In PhpStorm's top right corner, ensure the telephone icon (Listen for Debug Connections) is active (it should be green).
- In your browser, navigate to the web application you're running in your Vagrant box.
- If everything is set up correctly, when you hit the line with the breakpoint, PhpStorm should highlight the line and let you inspect variables, step through the code, etc.
- Happy debugging!
Remember, sometimes configurations or paths may vary slightly based on the versions of software you're using, so always refer to the documentation if you encounter any issues.
Profiling with Xdebug
Xdebug is a powerful tool for debugging and profiling PHP code. To measure the execution time of a block of code using it, enable the profiling feature by adding or modifying the following settings in the 20-xdebug.ini file:
xdebug.mode = profile
xdebug.start_with_request = trigger
xdebug.output_dir = /home/vagrant/code
In the last line specified, the path leads to the shared projects folder on the virtual machine, allowing immediate access to the profiling files from Windows.
Activating profiling
To start profiling, request a page by passing the XDEBUG_PROFILE parameter. For example: http://yourdomain.com/yourscript.php?XDEBUG_PROFILE=1. This will cause Xdebug to create a profiling file.
To profile a specific block of code, use xdebug_start_profiling() and xdebug_stop_profiling() at the beginning and end of the block, respectively.
Analyzing results
After the code execution is completed, a profiling file with the .cachegrind extension will appear in the specified directory (xdebug.output_dir). To analyze it without PhpStorm, it is recommended to use KCacheGrind (Linux) or QCacheGrind (Windows, macOS). Inside these programs you will be able to analyze the execution time of each function.
In PhpStorm, this file can be opened via Tools > Analyze Xdebug Profiler Snapshot. Once the profiling file is loaded, PhpStorm will provide you with detailed information about the time and memory used to execute each function.
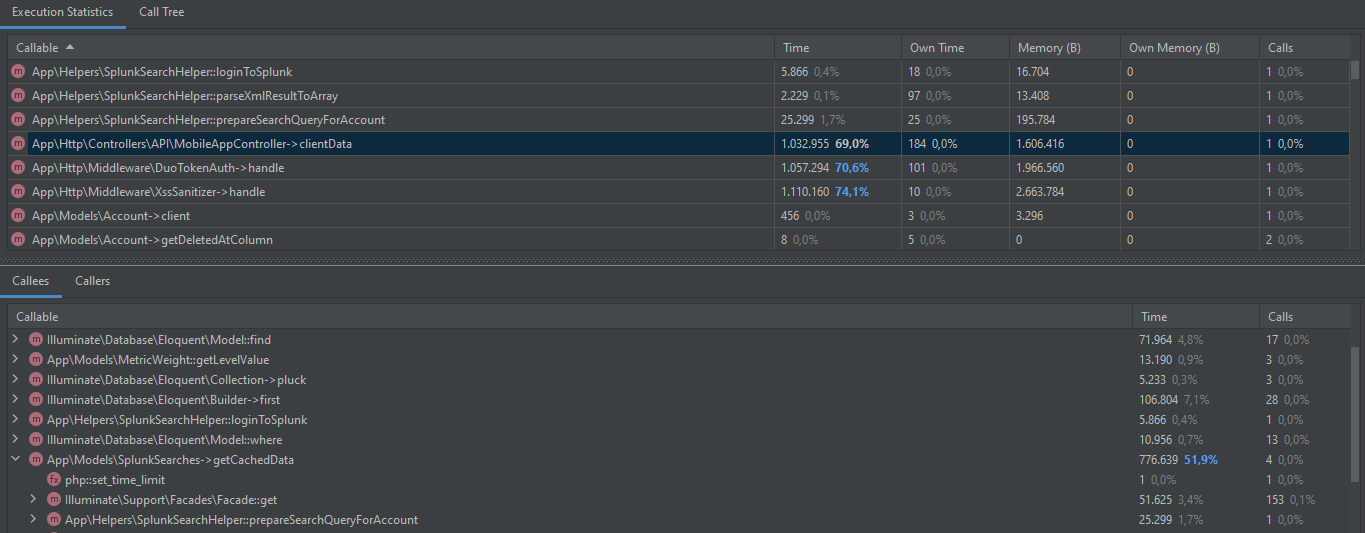
Based on this data, you will be able to identify bottlenecks in your code and make the necessary optimizations.
Remember: profiling can slow down your code, so do not use it all the time on a production server or in normal application mode.
Solving problems with Xdebug
It often happens that when you follow a proven instruction, you don't get the expected result. There can be many reasons for this, and unfortunately, not all of them are easy to take into account. Below are typical problems and how to solve them in the context of using Xdebug:
- Xdebug is installed but not active on the server: If the php -m | grep xdebug command does not return a result, make sure you have configured Xdebug for the correct version of PHP. As a reminder, different projects may use different versions of PHP, and you will need to configure Xdebug for each.
- Using xdebug_info(): If you run into problems, try calling the PHP function xdebug_info(). This will show up-to-date information about your Xdebug settings and help you make sure they are correct.
- Xdebug is active but phpStorm is not responding: If Xdebug is running on the server but phpStorm is not receiving signals, the possible cause could be your firewall or firewall. Check the rules of incoming and outgoing connections. In my case, this was the problem: everything was working correctly at first, but later the connection suddenly dropped.
- Profiling mode: If Xdebug is configured in profiling mode, note that it will not debug code.
Remember that tools and systems are constantly evolving, so it is always a good idea to consult the latest documentation and the developer community if you encounter problems.